> ## Documentation Index
> Fetch the complete documentation index at: https://qualcomm-0801e48b-fix-serve-reasoning-format.mintlify.site/llms.txt
> Use this file to discover all available pages before exploring further.
# 本地服务器
> 在 localhost 提供兼容 OpenAI 协议的 HTTP API,由骁龙 NPU/GPU/CPU 加速支撑。
GenieX 内置推理服务器,提供**兼容 OpenAI 协议的 API**。在设备端运行模型,并连接到任意支持 OpenAI 协议的应用或框架——例如 **LangChain** 等智能体框架、**OpenClaw** 等 AI 原生应用,或你自己的代码。无需云端依赖。
## **前置条件**
* 已安装 CLI——详见[安装](/cn/run/cli/install)。
* 容器内交互式 shell(仅 Docker)——详见[交互式运行](/cn/run/linux/install#交互式运行)。
* 已拉取模型。`geniex serve` **不会**自动下载模型。
## **启动服务器**
拉取模型:
```bash bash theme={null}
geniex pull ai-hub-models/Qwen3-4B-Instruct-2507
```
启动服务器:
```bash bash theme={null}
geniex serve
```
服务器默认运行在 `http://127.0.0.1:18181`。保持该终端开启,并在另一个终端中发送请求。运行 `geniex serve -h` 查看所有可配置选项。
## **POST /v1/chat/completions**
为给定对话创建模型响应。支持 LLM(纯文本)与 VLM(图像 + 文本)。
### **LLM 请求**
```json Example Value theme={null}
{
"model": "ai-hub-models/Qwen3-4B-Instruct-2507",
"messages": [
{"role": "user", "content": "Hello! Briefly introduce yourself."}
],
"max_tokens": 256,
"temperature": 0.7,
"stream": false
}
```
### **通过 Swagger UI 试用**
在浏览器中打开 `http://127.0.0.1:18181` 即可访问内置的 Swagger UI。
**步骤 1.** 展开 `POST /v1/chat/completions` 端点,查看示例请求体与 schema。
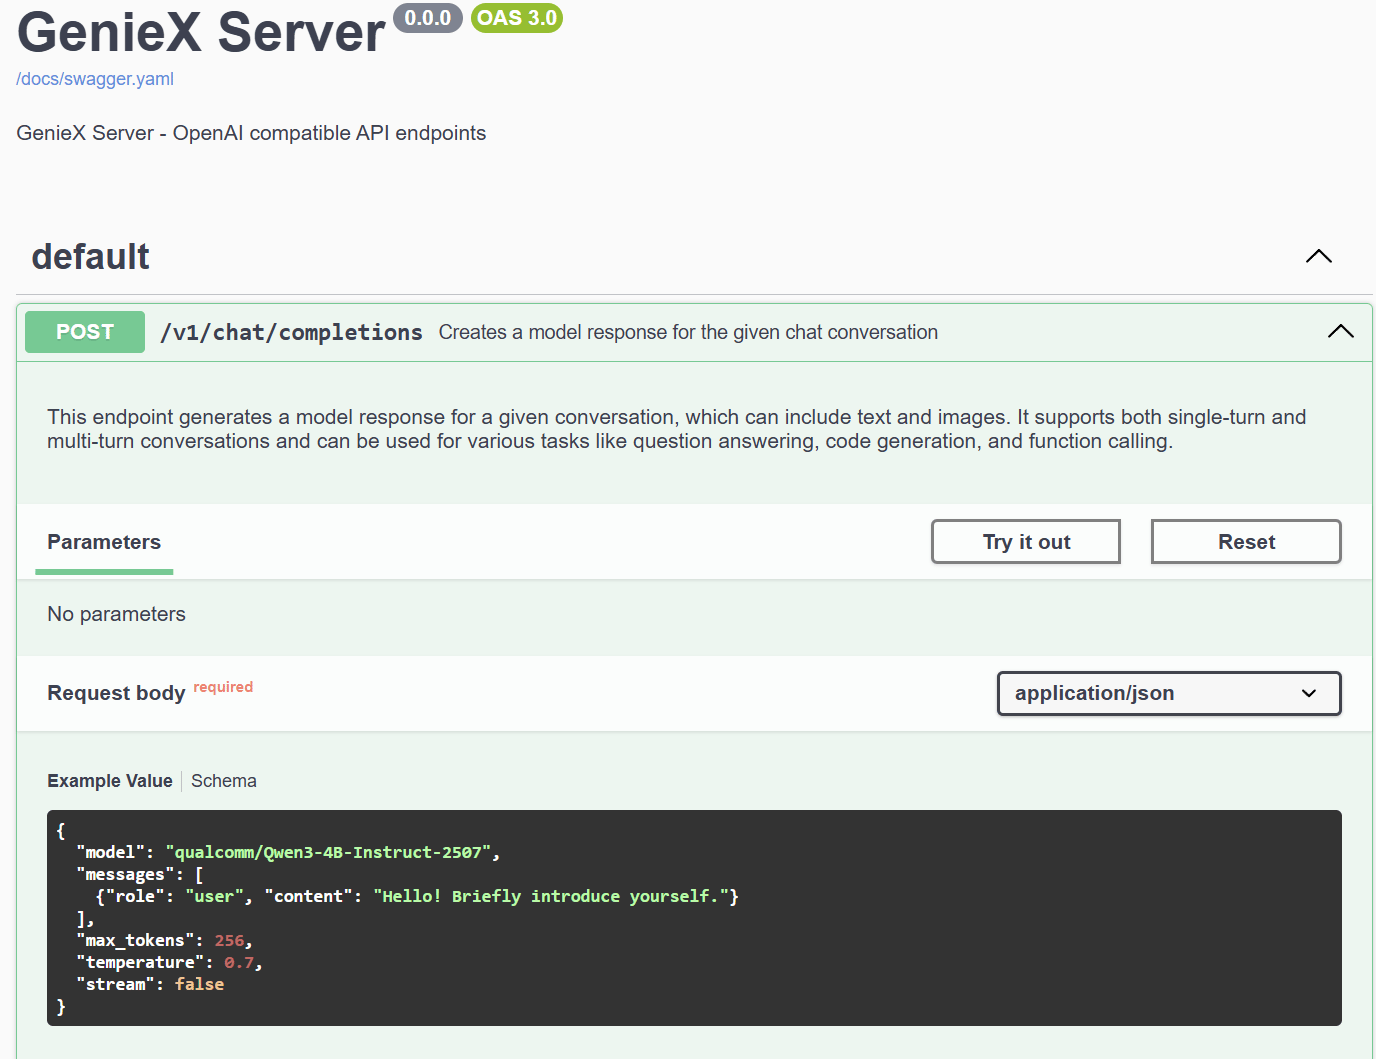 **步骤 2.** 点击 **Try it out**,根据需要编辑请求体,然后点击 **Execute**。
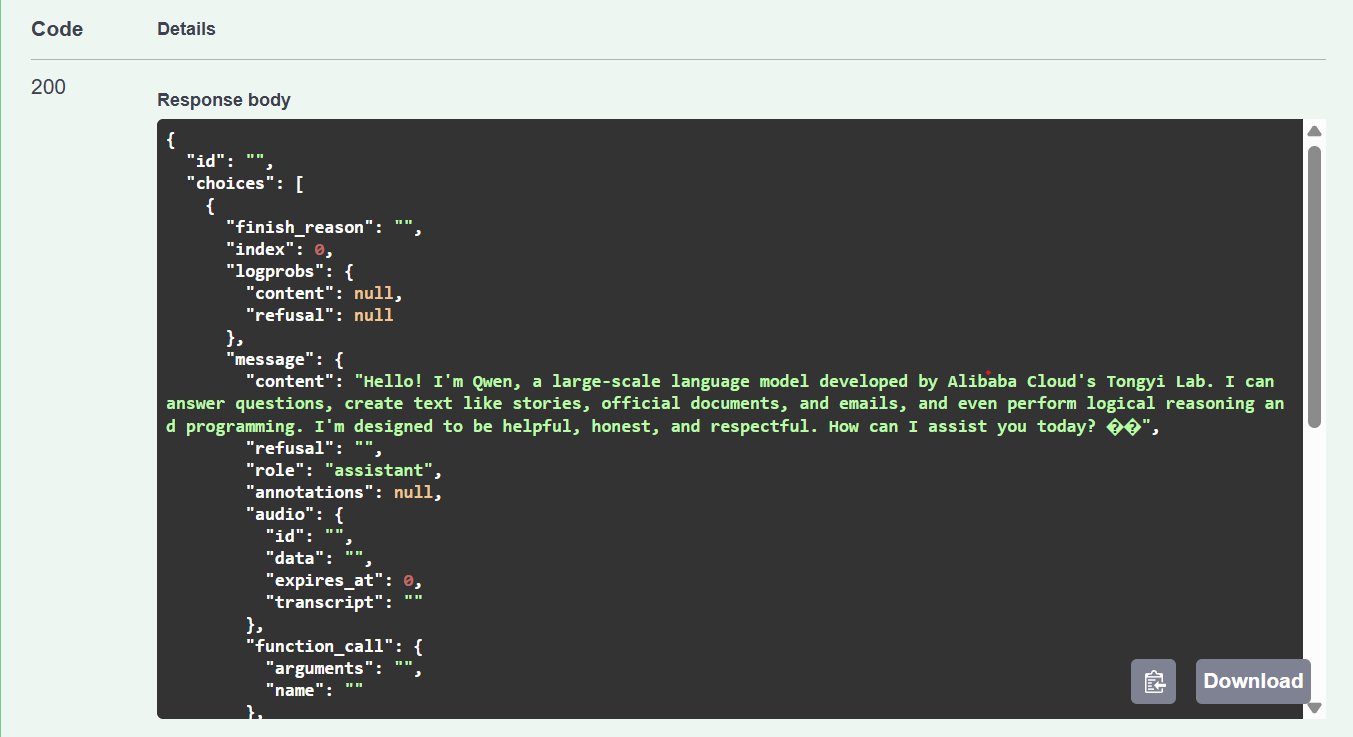
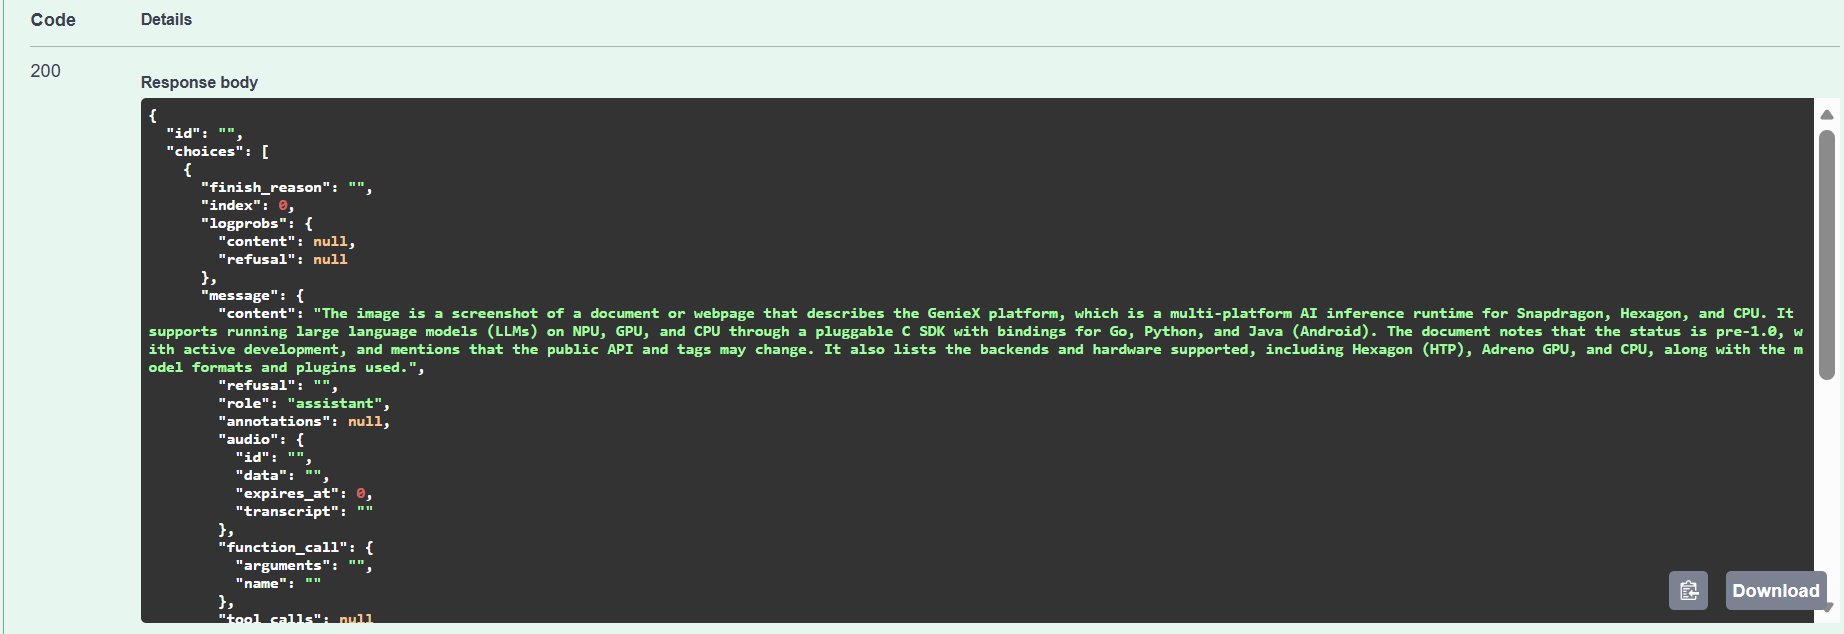
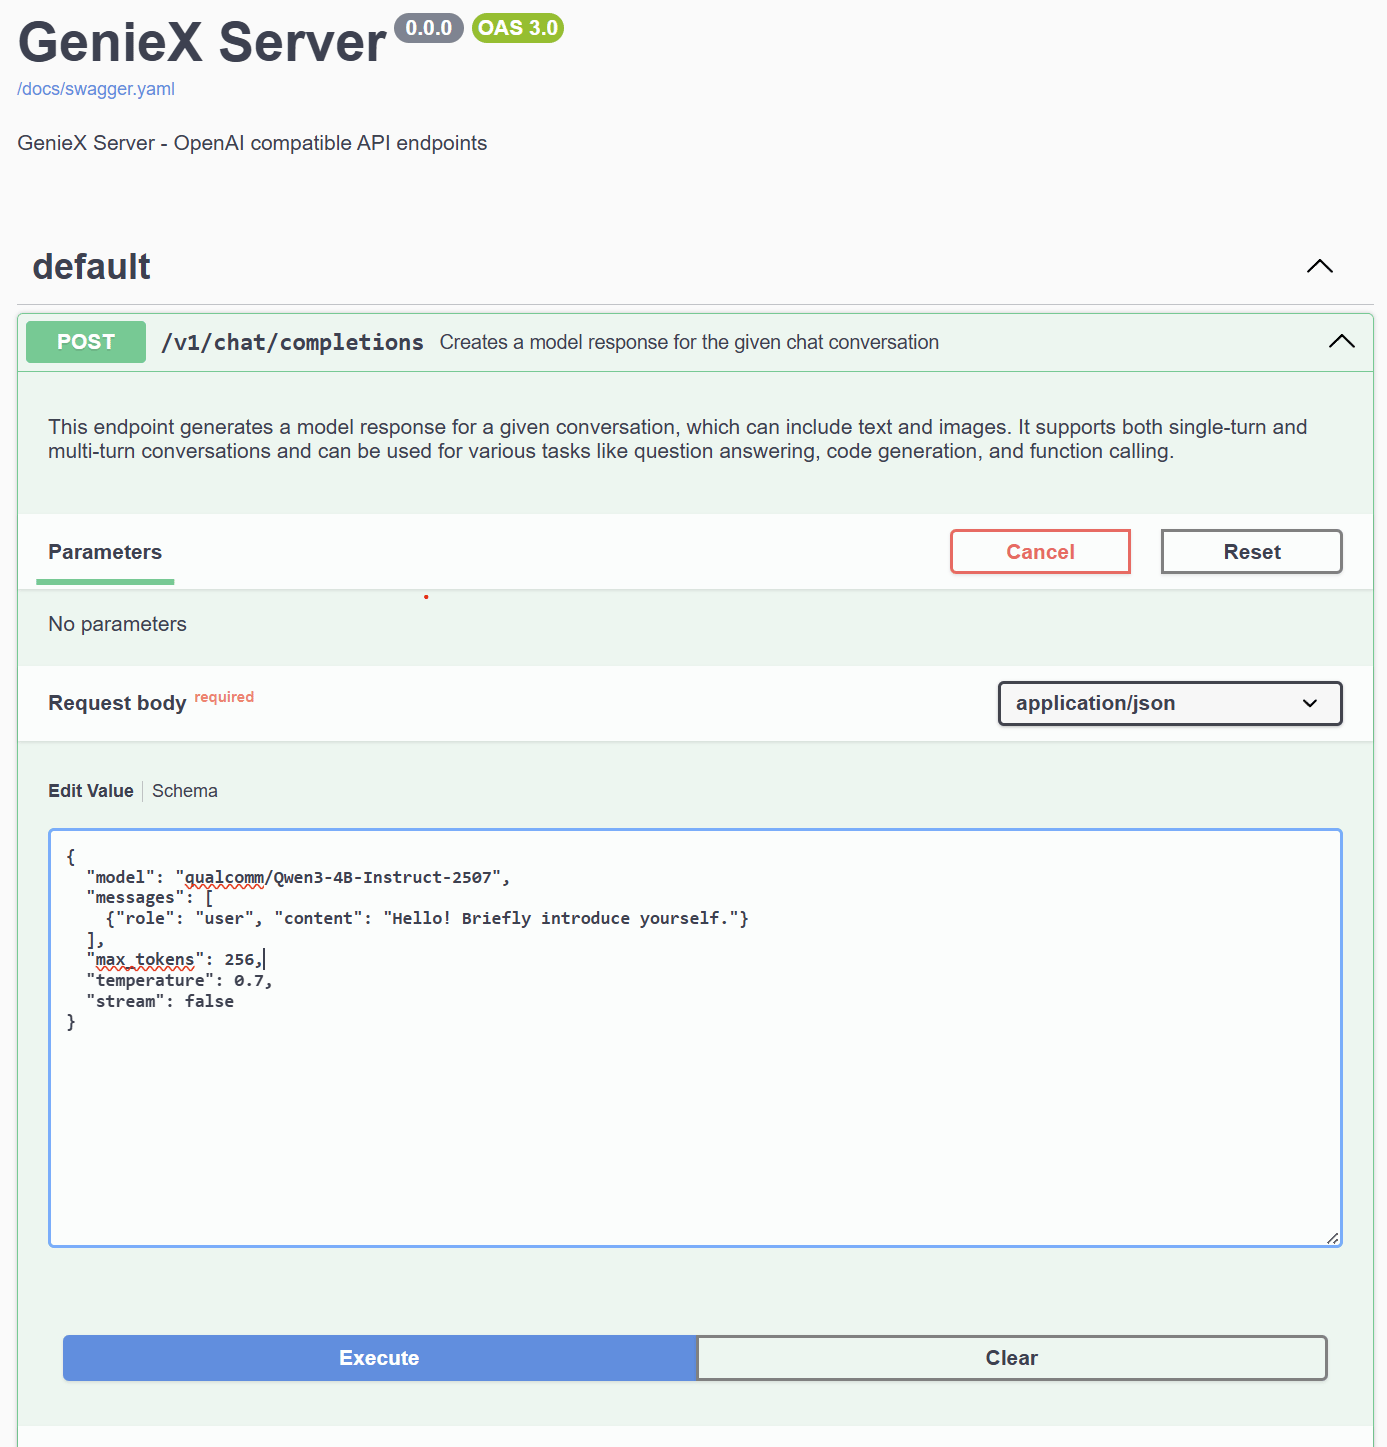 **步骤 3.** 查看响应——`200` 状态码以及模型生成的回复。
 ### **VLM 请求**
`image_url.url` 支持三种格式:
| 格式 | 示例 |
| ------------------------ | -------------------------------------------------------------- |
| 本地文件路径(`file://` 前缀可选) | `C:/Users/Username/Pictures/photo.jpg`、`file:///tmp/photo.jpg` |
| HTTP / HTTPS URL——由服务器拉取 | `https://example.com/image.jpg` |
| Base64 data URL——内联图像字节 | `data:image/png;base64,iVBORw0KGgo...` |
**在 Docker 中运行?** 本地路径会在**容器内**解析,而不是主机。安装命令已经把 `$PWD/data` 挂载到 `/data`——把图片放进去,然后传 `/data/cat.jpg` 即可。或者直接用 HTTP URL 或 base64 data URL,绕过文件系统。
```json Example Value theme={null}
{
"model": "ai-hub-models/Qwen2.5-VL-7B-Instruct",
"messages": [
{
"role": "user",
"content": [
{"type": "text", "text": "Describe this image succinctly."},
{"type": "image_url", "image_url": {"url": ""}}
]
}
]
}
```
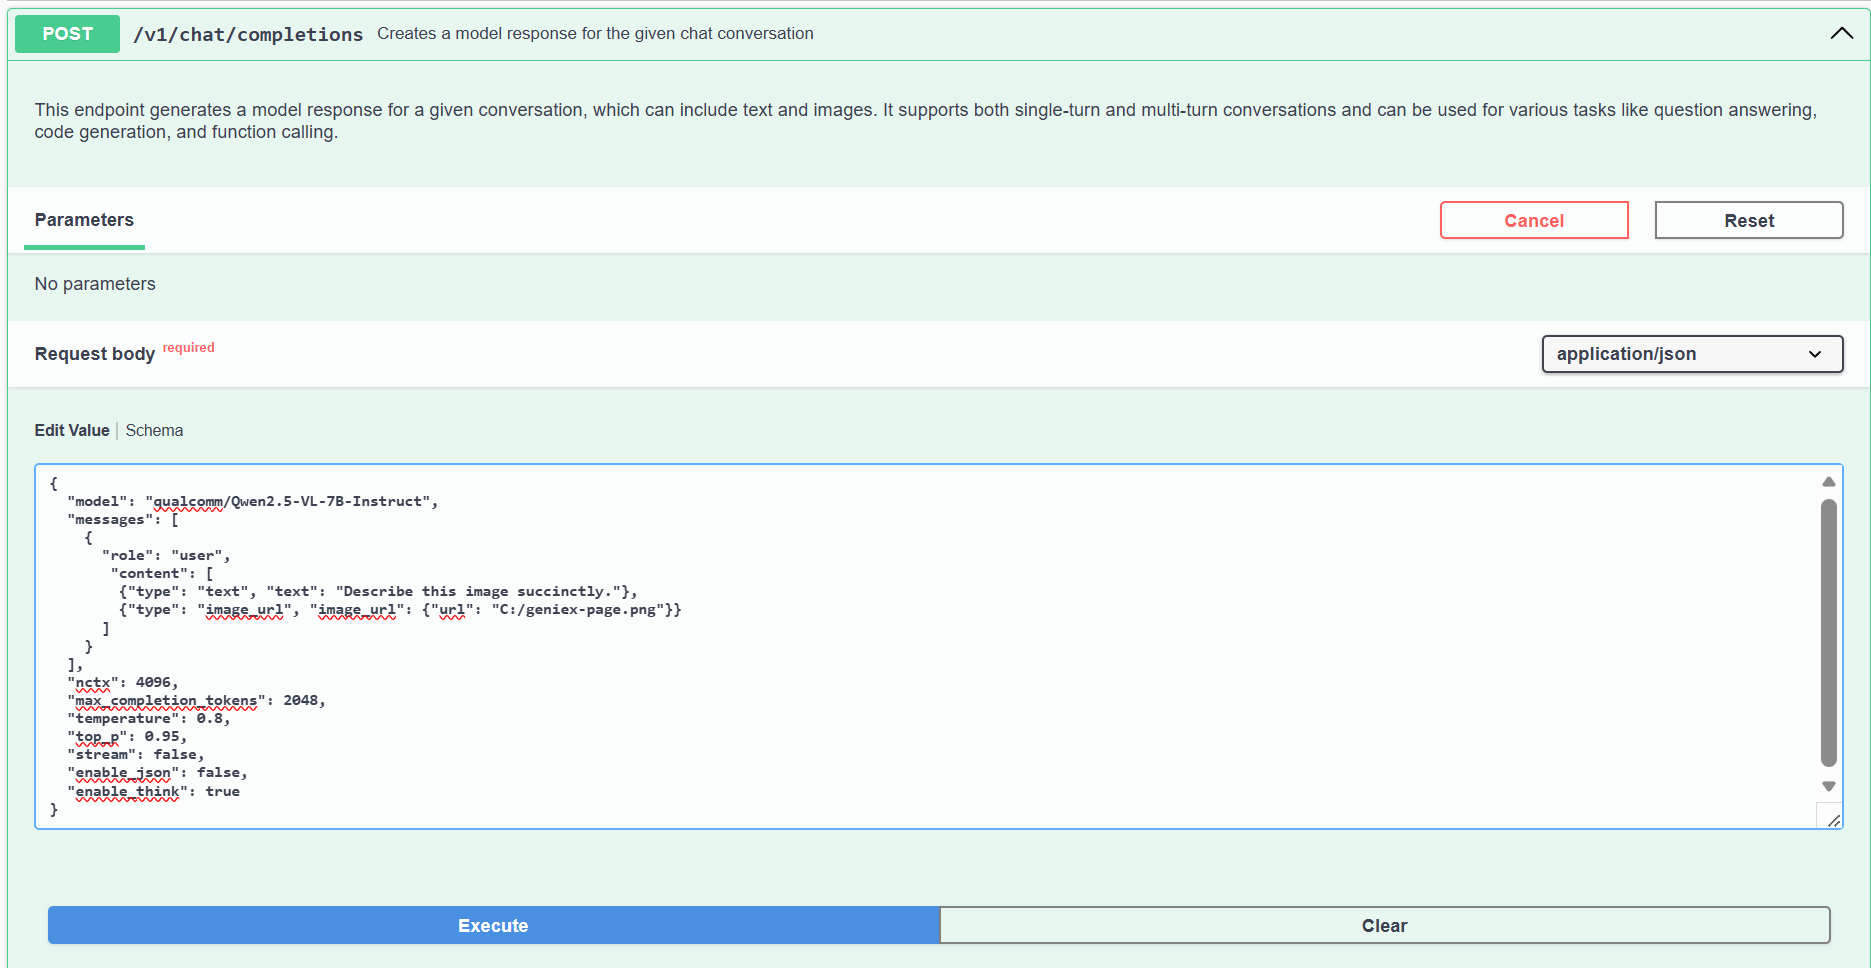
在 Swagger UI 中将请求体替换为上述 VLM payload,把 `image_url.url` 指向本地图片,然后点击 **Execute**。
### **VLM 请求**
`image_url.url` 支持三种格式:
| 格式 | 示例 |
| ------------------------ | -------------------------------------------------------------- |
| 本地文件路径(`file://` 前缀可选) | `C:/Users/Username/Pictures/photo.jpg`、`file:///tmp/photo.jpg` |
| HTTP / HTTPS URL——由服务器拉取 | `https://example.com/image.jpg` |
| Base64 data URL——内联图像字节 | `data:image/png;base64,iVBORw0KGgo...` |
**在 Docker 中运行?** 本地路径会在**容器内**解析,而不是主机。安装命令已经把 `$PWD/data` 挂载到 `/data`——把图片放进去,然后传 `/data/cat.jpg` 即可。或者直接用 HTTP URL 或 base64 data URL,绕过文件系统。
```json Example Value theme={null}
{
"model": "ai-hub-models/Qwen2.5-VL-7B-Instruct",
"messages": [
{
"role": "user",
"content": [
{"type": "text", "text": "Describe this image succinctly."},
{"type": "image_url", "image_url": {"url": ""}}
]
}
]
}
```
在 Swagger UI 中将请求体替换为上述 VLM payload,把 `image_url.url` 指向本地图片,然后点击 **Execute**。
 ## **Python 客户端(OpenAI SDK)**
由于服务器使用 OpenAI 协议,可直接将官方 `openai` Python 客户端指向本地端点,复用任意已有的 OpenAI 代码。先通过 `pip install openai` 安装,然后创建 client:
```python python theme={null}
from openai import OpenAI
client = OpenAI(
base_url="http://127.0.0.1:18181/v1",
api_key="geniex", # any non-empty string; the server does not check it
)
```
下面的示例都复用此 `client`。请把 `model` 替换为已拉取的模型;可选的 `:` 后缀(例如 `Q4_0`、`Q4_K_M`、`Q8_0`)选择量化变体——`Q4_0` 推荐用于 Hexagon NPU 上的 llama.cpp。详见[支持的精度(量化)](/cn/models/supported#支持的精度量化)。
### **流式(Streaming)**
按 delta 到达顺序逐段打印:
```python python theme={null}
stream = client.chat.completions.create(
model="unsloth/Qwen3-4B-GGUF:Q4_0",
messages=[
{"role": "user", "content": "Hello! Briefly introduce yourself."},
],
max_tokens=256,
temperature=0.7,
stream=True,
)
for chunk in stream:
delta = chunk.choices[0].delta.content
if delta:
print(delta, end="", flush=True)
print()
```
### **Chat completion(非流式)**
单次请求、单次响应,不启用流式——标准的 OpenAI `chat.completions.create` 形式。`enable_think=False` 关闭 Qwen3 默认的 `…` 推理前缀,让回复内容更干净。
```python python theme={null}
resp = client.chat.completions.create(
model="unsloth/Qwen3-4B-GGUF:Q4_0",
messages=[
{"role": "user", "content": "Hello! Briefly introduce yourself."},
],
max_tokens=128,
temperature=0.7,
extra_body={"enable_think": False},
)
print(resp.choices[0].message.content)
print("finish_reason:", resp.choices[0].finish_reason)
print("usage:", resp.usage)
```
输出:
```text theme={null}
Hello! I'm Qwen, a large language model developed by Alibaba Cloud. I can help with a wide range of tasks, including answering questions, writing articles, creating stories, and more. I'm here to assist you in any way I can! How can I help you today?
finish_reason: stop
usage: CompletionUsage(completion_tokens=58, prompt_tokens=19, total_tokens=77, ...)
```
### **分离推理内容(reasoning\_content)**
思考模型默认会把思维链原样保留在 `message.content`(`…`),与最终回复混在一起。传入 `reasoning_format="deepseek"` 可让服务器把思维链拆到 OpenAI 标准的 `message.reasoning_content` 字段,`content` 只保留干净的回复。
`reasoning_format` 与 `enable_think` 是两件事:`enable_think=False` 让模型**不产生**思维链;`reasoning_format="deepseek"` 让模型照常思考,但把思维链**移出** `content`。取值 `none`(默认)保持原样内联,`deepseek` / `deepseek-legacy` / `auto` 均触发分离。工具调用请求会忽略该参数(工具解析需要原始带标签的文本)。
```python python theme={null}
resp = client.chat.completions.create(
model="unsloth/Qwen3-4B-GGUF:Q4_0",
messages=[
{"role": "user", "content": "What is 2+2? Answer briefly."},
],
max_tokens=128,
extra_body={"reasoning_format": "deepseek"},
)
msg = resp.choices[0].message
print("reasoning:", msg.model_extra.get("reasoning_content"))
print("content:", msg.content)
```
流式响应同理——思维链以 `delta.reasoning_content` 增量返回,最终回复以 `delta.content` 返回。
### **工具调用(Tool calling)**
函数/工具调用使用标准的 OpenAI `tools` schema。服务器会从模型生成的文本中解析工具调用(`…` 标签或 ` ```json ` 代码块),并以 OpenAI `tool_calls` 形式返回。VLM **也走同一条路径**——模型可以先看图,再决定搜什么、调用工具。
下面的示例用 `qualcomm/Qwen3-VL-4B-Instruct` 演示两步 agentic 回路:(1) VLM 从照片中识别地标并调用 `web_search`;(2) 本地执行搜索并将结果回传,VLM 基于结果生成带依据的回复。
每次助手响应仅解析一个工具调用——暂不支持单次响应中的并行工具调用。
Qwen3-VL 稳定触发工具调用需要注意两点:
1. 用 system 消息显式说明 `…` 的格式(Qwen3-VL 的 chat template 对该格式的先验没有 Qwen3 纯文本版本那么强)。
2. 第二轮不再传入 `tools=`,也不要再回传图像——否则 VLM 会重复调用工具,且视觉编码器会对同一张图再跑一次。
先安装示例使用的搜索库(`pip install ddgs` —— DuckDuckGo,无需 API key):
```python python theme={null}
import json
from ddgs import DDGS
tools = [
{
"type": "function",
"function": {
"name": "web_search",
"description": "Search the web for travel information about a location.",
"parameters": {
"type": "object",
"properties": {
"query": {"type": "string", "description": "Search query, e.g. 'things to do in Kyoto'"},
},
"required": ["query"],
},
},
}
]
def web_search(query: str) -> list[dict]:
return [
{"title": r["title"], "snippet": r["body"], "url": r["href"]}
for r in DDGS().text(query, max_results=3)
]
IMAGE_URL = "https://images.pexels.com/photos/402028/pexels-photo-402028.jpeg?w=1024"
system_prompt = (
"You are a travel assistant. Call the web_search tool to look up any location "
"the user asks about before answering. Once you receive the tool results, do not "
"call the tool again - use them to write a short, friendly reply for the user. "
"Emit tool calls in the exact format: "
'{"name": "web_search", "arguments": {"query": ""}}'
)
messages = [
{"role": "system", "content": system_prompt},
{
"role": "user",
"content": [
{"type": "image_url", "image_url": {"url": IMAGE_URL}},
{"type": "text", "text": "Identify the landmark, then call web_search for travel tips about it."},
],
},
]
# 第一步 —— VLM 识别地标并请求调用 web_search。
first = client.chat.completions.create(
model="qualcomm/Qwen3-VL-4B-Instruct",
messages=messages,
tools=tools,
tool_choice="auto",
max_tokens=512,
extra_body={"enable_think": False},
)
call = first.choices[0].message.tool_calls[0]
print("finish_reason:", first.choices[0].finish_reason) # -> "tool_calls"
print("call:", call.function.name, call.function.arguments)
# 第二步 —— 执行工具,并以纯文本对话把结果回传。
result = web_search(**json.loads(call.function.arguments))
followup = [
{"role": "system", "content": system_prompt},
{"role": "user", "content": "Summarize travel tips using the search results below."},
first.choices[0].message,
{"role": "tool", "tool_call_id": call.id, "content": json.dumps(result)},
]
final = client.chat.completions.create(
model="qualcomm/Qwen3-VL-4B-Instruct",
messages=followup,
max_tokens=256,
extra_body={"enable_think": False},
)
print(final.choices[0].message.content)
```
输出(依赖 DuckDuckGo 实时结果,具体文字随当天返回内容而变化):
```text theme={null}
finish_reason: tool_calls
call: web_search {"query": "Kiyomizu-dera travel tips"}
Here's a quick summary of travel tips for Kiyomizu-dera in Kyoto:
**1. Best Times to Visit:**
Early morning (around 7-8 AM) or late afternoon (4-6 PM) are ideal to avoid the crowds.
Peak hours (11 AM–2 PM) can be very busy, so plan accordingly.
**2. How to Get There:**
Take the Kiyomizu-dera train or bus from Kyoto Station to the temple.
The temple is located on a hill with a wooden stage built without nails, and the walkways are accessible, though narrow.
**3. What to See:**
- The great wooden stage (without nails)
- Otawa waterfall and its three streams
- Jishu love shrine
- The Sannenzaka and Ninenzaka approach streets
- Night illuminations (best experienced at night)
...
```
## **其他端点**
* `GET /v1/models`——列出可用模型。
* `GET /v1/models/{model}`——查询指定模型的信息。
## **Python 客户端(OpenAI SDK)**
由于服务器使用 OpenAI 协议,可直接将官方 `openai` Python 客户端指向本地端点,复用任意已有的 OpenAI 代码。先通过 `pip install openai` 安装,然后创建 client:
```python python theme={null}
from openai import OpenAI
client = OpenAI(
base_url="http://127.0.0.1:18181/v1",
api_key="geniex", # any non-empty string; the server does not check it
)
```
下面的示例都复用此 `client`。请把 `model` 替换为已拉取的模型;可选的 `:` 后缀(例如 `Q4_0`、`Q4_K_M`、`Q8_0`)选择量化变体——`Q4_0` 推荐用于 Hexagon NPU 上的 llama.cpp。详见[支持的精度(量化)](/cn/models/supported#支持的精度量化)。
### **流式(Streaming)**
按 delta 到达顺序逐段打印:
```python python theme={null}
stream = client.chat.completions.create(
model="unsloth/Qwen3-4B-GGUF:Q4_0",
messages=[
{"role": "user", "content": "Hello! Briefly introduce yourself."},
],
max_tokens=256,
temperature=0.7,
stream=True,
)
for chunk in stream:
delta = chunk.choices[0].delta.content
if delta:
print(delta, end="", flush=True)
print()
```
### **Chat completion(非流式)**
单次请求、单次响应,不启用流式——标准的 OpenAI `chat.completions.create` 形式。`enable_think=False` 关闭 Qwen3 默认的 `…` 推理前缀,让回复内容更干净。
```python python theme={null}
resp = client.chat.completions.create(
model="unsloth/Qwen3-4B-GGUF:Q4_0",
messages=[
{"role": "user", "content": "Hello! Briefly introduce yourself."},
],
max_tokens=128,
temperature=0.7,
extra_body={"enable_think": False},
)
print(resp.choices[0].message.content)
print("finish_reason:", resp.choices[0].finish_reason)
print("usage:", resp.usage)
```
输出:
```text theme={null}
Hello! I'm Qwen, a large language model developed by Alibaba Cloud. I can help with a wide range of tasks, including answering questions, writing articles, creating stories, and more. I'm here to assist you in any way I can! How can I help you today?
finish_reason: stop
usage: CompletionUsage(completion_tokens=58, prompt_tokens=19, total_tokens=77, ...)
```
### **分离推理内容(reasoning\_content)**
思考模型默认会把思维链原样保留在 `message.content`(`…`),与最终回复混在一起。传入 `reasoning_format="deepseek"` 可让服务器把思维链拆到 OpenAI 标准的 `message.reasoning_content` 字段,`content` 只保留干净的回复。
`reasoning_format` 与 `enable_think` 是两件事:`enable_think=False` 让模型**不产生**思维链;`reasoning_format="deepseek"` 让模型照常思考,但把思维链**移出** `content`。取值 `none`(默认)保持原样内联,`deepseek` / `deepseek-legacy` / `auto` 均触发分离。工具调用请求会忽略该参数(工具解析需要原始带标签的文本)。
```python python theme={null}
resp = client.chat.completions.create(
model="unsloth/Qwen3-4B-GGUF:Q4_0",
messages=[
{"role": "user", "content": "What is 2+2? Answer briefly."},
],
max_tokens=128,
extra_body={"reasoning_format": "deepseek"},
)
msg = resp.choices[0].message
print("reasoning:", msg.model_extra.get("reasoning_content"))
print("content:", msg.content)
```
流式响应同理——思维链以 `delta.reasoning_content` 增量返回,最终回复以 `delta.content` 返回。
### **工具调用(Tool calling)**
函数/工具调用使用标准的 OpenAI `tools` schema。服务器会从模型生成的文本中解析工具调用(`…` 标签或 ` ```json ` 代码块),并以 OpenAI `tool_calls` 形式返回。VLM **也走同一条路径**——模型可以先看图,再决定搜什么、调用工具。
下面的示例用 `qualcomm/Qwen3-VL-4B-Instruct` 演示两步 agentic 回路:(1) VLM 从照片中识别地标并调用 `web_search`;(2) 本地执行搜索并将结果回传,VLM 基于结果生成带依据的回复。
每次助手响应仅解析一个工具调用——暂不支持单次响应中的并行工具调用。
Qwen3-VL 稳定触发工具调用需要注意两点:
1. 用 system 消息显式说明 `…` 的格式(Qwen3-VL 的 chat template 对该格式的先验没有 Qwen3 纯文本版本那么强)。
2. 第二轮不再传入 `tools=`,也不要再回传图像——否则 VLM 会重复调用工具,且视觉编码器会对同一张图再跑一次。
先安装示例使用的搜索库(`pip install ddgs` —— DuckDuckGo,无需 API key):
```python python theme={null}
import json
from ddgs import DDGS
tools = [
{
"type": "function",
"function": {
"name": "web_search",
"description": "Search the web for travel information about a location.",
"parameters": {
"type": "object",
"properties": {
"query": {"type": "string", "description": "Search query, e.g. 'things to do in Kyoto'"},
},
"required": ["query"],
},
},
}
]
def web_search(query: str) -> list[dict]:
return [
{"title": r["title"], "snippet": r["body"], "url": r["href"]}
for r in DDGS().text(query, max_results=3)
]
IMAGE_URL = "https://images.pexels.com/photos/402028/pexels-photo-402028.jpeg?w=1024"
system_prompt = (
"You are a travel assistant. Call the web_search tool to look up any location "
"the user asks about before answering. Once you receive the tool results, do not "
"call the tool again - use them to write a short, friendly reply for the user. "
"Emit tool calls in the exact format: "
'{"name": "web_search", "arguments": {"query": ""}}'
)
messages = [
{"role": "system", "content": system_prompt},
{
"role": "user",
"content": [
{"type": "image_url", "image_url": {"url": IMAGE_URL}},
{"type": "text", "text": "Identify the landmark, then call web_search for travel tips about it."},
],
},
]
# 第一步 —— VLM 识别地标并请求调用 web_search。
first = client.chat.completions.create(
model="qualcomm/Qwen3-VL-4B-Instruct",
messages=messages,
tools=tools,
tool_choice="auto",
max_tokens=512,
extra_body={"enable_think": False},
)
call = first.choices[0].message.tool_calls[0]
print("finish_reason:", first.choices[0].finish_reason) # -> "tool_calls"
print("call:", call.function.name, call.function.arguments)
# 第二步 —— 执行工具,并以纯文本对话把结果回传。
result = web_search(**json.loads(call.function.arguments))
followup = [
{"role": "system", "content": system_prompt},
{"role": "user", "content": "Summarize travel tips using the search results below."},
first.choices[0].message,
{"role": "tool", "tool_call_id": call.id, "content": json.dumps(result)},
]
final = client.chat.completions.create(
model="qualcomm/Qwen3-VL-4B-Instruct",
messages=followup,
max_tokens=256,
extra_body={"enable_think": False},
)
print(final.choices[0].message.content)
```
输出(依赖 DuckDuckGo 实时结果,具体文字随当天返回内容而变化):
```text theme={null}
finish_reason: tool_calls
call: web_search {"query": "Kiyomizu-dera travel tips"}
Here's a quick summary of travel tips for Kiyomizu-dera in Kyoto:
**1. Best Times to Visit:**
Early morning (around 7-8 AM) or late afternoon (4-6 PM) are ideal to avoid the crowds.
Peak hours (11 AM–2 PM) can be very busy, so plan accordingly.
**2. How to Get There:**
Take the Kiyomizu-dera train or bus from Kyoto Station to the temple.
The temple is located on a hill with a wooden stage built without nails, and the walkways are accessible, though narrow.
**3. What to See:**
- The great wooden stage (without nails)
- Otawa waterfall and its three streams
- Jishu love shrine
- The Sannenzaka and Ninenzaka approach streets
- Night illuminations (best experienced at night)
...
```
## **其他端点**
* `GET /v1/models`——列出可用模型。
* `GET /v1/models/{model}`——查询指定模型的信息。